what to use to seal ceramic tile outdoor table top
Build an Outdoor Tabular array With Tile Tiptop and Steel Base
Updated: February. 25, 2022
Buy This PDF & Cut List
Construct a modest, circular tile top patio table with a tiled plywood and cement board height and hand-bent metallic legs.
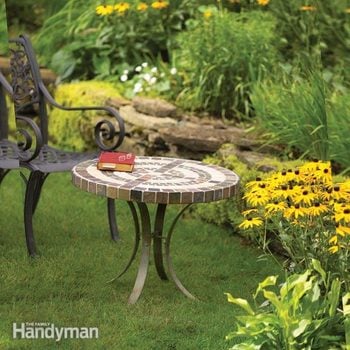
This tile top patio table is simple to make, simply it's engineered to agree up in any conditions. All the materials are available at dwelling centers, y'all don't need any special tools to make it and you'll save lots of money by making it yourself. Plus, these tables make a beautiful addition to any deck or patio.
You might too like: TBD
- Time
- Complication
- Price
- Multiple Days
- Beginner
- $101–250
Buy This PDF & Cut List
Step 1: Tile Meridian Patio Table Overview
You can build this table with uncomplicated tools and basic skills. Get your wood and steel at a home heart, and look for interesting tile at a local tile supplier. Ask to run into a porcelain or stone tile (or a combination) that'll withstand harsh weather conditions. Our table, with 2 sizes of stone tile, price nigh one-fifth the cost of a store-bought table!
This tabletop is made from a plywood cadre wrapped in cement board, sealed with a paint-on membrane and so covered with ceramic tile and grout. The leg base of operations is made from sturdy steel bars (from your home center or hardware store) that you bend (with the aid of a template and homemade jig) into pleasing curves. Then you drill and assemble them and finally, screw them to the tabletop.
Don't worry if you didn't pay attention during metal shop. We'll evidence you a seat-of-the-pants method for bending the steel without the expensive metal shop tools that a pro would utilize. Effigy on spending 10 to 12 hours over the class of a week to complete the project.
To help guide the procedure, we've broken the tasks down into daily steps. It accounts for time spent waiting for glue, mortar and sealer to dry out so you can finish the project efficiently. In total, this projection volition take about half dozen days.
Step 2: Make the bending jig, tabletop cadre and full-size leg template
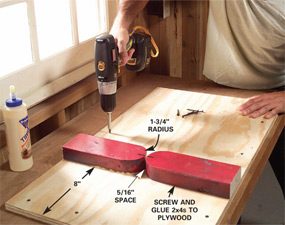
Mosaic Outdoor Tabular array Photo i: Build the bending jig
Glue and spiral 2 2×4 blocks to a 16 x 36-in. sheet of 3/4-in. plywood, then screw the plywood to your workbench. Let the glue dry out overnight earlier using the jig.

Mosaic Outdoor Tabular array Photo 2: Cut out the plywood base
Marker 2 xiii-in. radius (26-in. bore) discs on i/two-in. CDX plywood using a compass made from a strip of chip forest. Cut out the discs with a jigsaw.
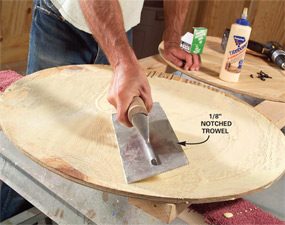
Mosaic Outdoor Table Photo 3: Gum the plywood discs
Spread water-resistant carpenter'south glue onto each disc with a 1/8-in. notched trowel. Advisedly align the edges of the discs and screw them together with 1-1/4 in. screws spaced every half-dozen in. allow the mucilage dry, remove the screws and sand the edges of the disc to form a smooth curve.
Make the bending jig from a 16 x 36-in. sail of 3/4-in. plywood and two rounded-over lengths of 2×iv as shown in Photo 1. Gum the 2x4s to the plywood and drive 8 2-in. screws through the bottom side of the plywood into each 2×four. Why then many screws? These chunks of ii×four will be under a great deal of stress later on as you bend the steel bars.
Next, make two plywood discs (Photograph 2) from a four x iv-ft. sheet of 1/2-in. thick CDX plywood. There's no demand to buy fancy plywood for this because you'll be covering all sides of it. If the plywood is a bit bowed, position the bows opposite to each other to abolish the warp when you lot screw them together.
While you lot've got your carpentry tools out, brand a full-size template from a 12 x twenty-in. section of 1/four-in. plywood or hardboard every bit shown in Effigy A. Identify marks along all four sides in ane-in. increments and then draw connecting lines beyond. Plot the points as shown in Effigy A and and so draw a shine curve connecting the points.
Leg and Strut Details
Describe a full-size template for the legs on a piece of plywood using this scaled drawing every bit a guide. Drill commodities holes for the struts
Step 3: Shape the steel legs and mortar the cement board to the meridian

Photo iv: Bend slightly at each marking
Mark the one/4-in. 10 i-1/2 in. x 36-in. steel bar every inch with a permanent marker. Marshal the marks with the eye marks on the 2×4 blocks and firmly pull the bar until you lot feel it bend slightly. Move the bar to the side by side inch mark and keep with slight bends at each marking.

Photo v: Check the curve every bit y'all become
Check your bent bar with your template. So insert the bar into the jig once more and either bend or unbend it as needed. When you're finished, cut the steel to a 28-in. overall length with a hacksaw. So polish the rough edges with a metallic file.

Photograph half dozen: Mark the holes
Clamp the curved legs to the workbench, then use a sharp dial to mark the hole centers for the mounting screws and the associates bolts. Drill holes at 1/2 in., 1-1/2 in., four in. and 14 in. from the pinnacle terminate.
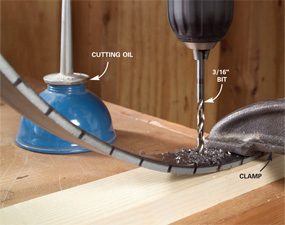
Photo 7: Drill the screw and commodities holes
Drill the 3/16-in. diameter holes through the legs, using a few drops of oil to lubricate the bit. Make sure to clamp the steel firmly while drilling.

Photo viii: Bend the struts
Cut the viii-in. long struts from 1/8-in. 10 three/iv-in. steel with your hacksaw. Place a marker 1-1/2 in. from each cease. Marshal the marks with the vise jaws, tighten and so hammer the piece to form crisp ninety-degree bends. Centre and drill bolt holes according to the strut detail in Figure A.

Photograph 9: Assemble the legs and struts
Screw the struts to the legs using No. 10 x iii/four-in. bolts and nuts. Tighten with a screwdriver. Note the position of the mounting holes.

Photograph 10: Cutting the cement board disc
Place the disc on a piece of 1/2-in. cement board and trace the circumvolve. Then cut it out with a jigsaw fitted with an abrasive cut blade.

Photo 11: Bond the cement board and plywood
Mix about 1-1/ii qts. of thin-gear up mortar to a toothpaste consistency. Let the mortar stand for ten minutes, and then spread it onto one side of your disc with a 1/iv-in. notched trowel. Screw the cement board to the plywood with 1-1/4 in. cement lath screws.

Photo 12: Adhere lath
Cut ane-3/8 in. strips of galvanized expanded metal lath (stucco lath) 7 ft. long. Nail the strips to the border of the disc. Utilise 1-i/4 in. galvanized roofing nails and space them every 4 in.

Photo 13: Cover the lath with mortar
Set the disc on a plastic sheet and mix nearly 1 qt. of thin-set mortar. Embed the mortar in the lath. Let it dry overnight. Then smooth off ridges and edges with a rasp.
Mark the 36-in. steel bar every inch (up to 28 in.) as shown in Photo four with a permanent marker. You lot'll cutting off the remaining eight in. after, but for now, you lot'll demand it for leverage while bending. Buy an extra piece in case i doesn't turn out—the bending process can be tricky.
Slide the bar betwixt the blocks, align the first mark with the center and pull the bar toward you. This first little bend is easy because yous accept a lot of mechanical reward. Don't be tempted to overbend; a tiny nudge at each marker adds upwards to a nice fifty-fifty curve.
When you get toward the last few marks of your bending, you may desire to pull the bar from the bent side to get a fleck more leverage. Check the piece of work piece every 5th curve or so to come across how information technology's matching up with your template. Yous may need to stick the leg piece back into the jig and unbend portions to get the curve to match your template. Don't let yourself get also aptitude out of shape trying to adjust exactly to the template. Close is skilful plenty.
Next, cut and bend the smaller ane/8-in. thick confined to brand the struts as shown in Figure A. Be sure to drill them accurately to ensure that the struts hold the legs every bit. Complete the leg assembly as shown in Photo 9.
The disc assembly you glued together the day before is now set to encompass with cement lath. Be sure to smooth the exterior bend of the plywood with a belt sander outfitted with a coarse chugalug.
A shine, even bend here volition give y'all a nice even edge to tile subsequently. Side by side, lay the disc on a sail of cement board, trace the shape using a carpenter's pencil and so cutting out the shapes with your jigsaw (Photo 10). You lot can cutting this stuff with a standard jigsaw blade, but yous'll demand virtually three blades to get through the circle. Instead, look for a special abrasive cutting blade for your jigsaw at your hardware store or habitation centre.
Mix your thin-set up mortar in a bucket to a toothpaste consistency, or if you're a melt, think of a bowl of mashed potatoes. Then permit it stand up for about x minutes to start the chemic reaction. Trowel the mortar onto the wood disc and then comb information technology with a 1/four-in. notched trowel.
The trowel helps you become just the right amount of mortar and distribute it evenly. Press the cement board slice into the mortar and immediately spiral it to the plywood disc (Photo 11). Yous can at present cut the metal stucco lath (Photo 12) and utilize information technology, then fill the lath with mortar. Allow the mortar fix until the next day.
Stride 4: Waterproof the disc and finalize your design

Photo 14: Use waterproofing membrane
Roll or brush two coats of waterproofing membrane on both sides and the edges, then let it dry overnight.
Knock the crude edges off the discs with a rasp and and then mitt-sand the edges with coarse sandpaper. Wipe off the dust and coil or brush on a coat of waterproofing membrane (available from home centers and tile suppliers).
The membrane will proceed moisture from migrating into the disc and causing the core to dandy and, downward the route, to fissure. Apply at least two coats, letting each coat dry. When I saw this stuff for the first time, I couldn't believe that the mortar would stick to it once it dried. Well, information technology does work and really seals the surface.
While the membrane is drying (24 hours), lay out your tile design and make sure it works. Make a cardboard disc the same size as your coated disc and draw concentric round guidelines onto it to help with your tile placement (Photo xvi).
At present is the time to try design options. I institute that a round design that radiates evenly outward works best, but feel free to endeavour anything. If you cease upward cutting tile, be sure to soften the sharp edge with a smoothing rock.
Step 5: Tile the tabular array border
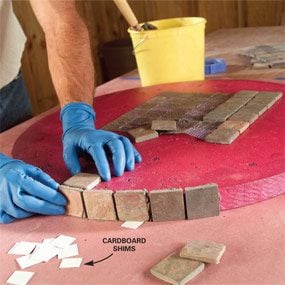
How to Tile a Table Photo 15: Set the edge tile
Butter the back of each tile with thin-fix mortar, push button it onto the edge of the tabular array disc and shim the height if necessary. Work your fashion effectually the disc and cut or adapt the tile spacing to fit the last piece. Look 24 hours before tiling the top.
Set your tabletop onto your workbench and then test the tile for coverage. I selected a rock tile for the sides that measured about 1-3/four in. square. The tile covered the one-ane/2 in. thick side with enough to spare to align with the acme tile.
You may have to shim the whole top slightly above the workbench or shim each tile with pieces of thin cardboard. Depending on the size of the tile, the tile tin can be lower than the bottom edge slightly or fifty-fifty upwardly from the lesser a bit; neither variation from flush volition exist noticed on a finished tabular array.
Mix the mortar and so butter the back of the tiles and press them into place (Photo fifteen).With a footling planning, you tin embrace the edge using only full tile by adjusting the width of the joint. When you've worked your way around the entire border, let the mortar set for 24 hours before tiling the meridian.
Step 6: Tile the top
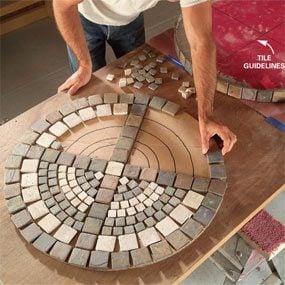
How to Tile a Table Photo 16: Follow the layout lines
Draw guidelines on your tabletop with a permanent marker and so trowel mortar onto only 1 quadrant of the elevation with a 1/4-in. notched trowel. Transfer your tile from your design to the mortared top, paying attention to your guidelines. Consummate each quadrant, let the mortar set up for 24 hours, so grout the top.
Position your design close to the tabletop (Photo 16). Make guidelines on your tabletop with a permanent marker to aid transfer the tile to the meridian accurately. And so set one section at a time to position the tile accurately.
I mixed up two smaller batches of mortar to consummate the tiptop so I wouldn't have to bustle through the positioning process before the mortar prepare. Apply the mortar to just one-4th of the top with your notched trowel and press the tile into place. Keep transferring tile and mixing new mortar every bit needed.
Go on the height of the tile surface make clean and mortar free. Subsequently a few hours, bank check for mortar that may have oozed upwardly above the tile surface. Information technology's easy to remove the mortar with a screwdriver while information technology's in this "plastic state" before it sets hard.
Stride 7: Fasten the leg associates to the table and grout the tabletop

Photo 17: Grout and get together
Centre the leg assembly onto the underside of the table and spiral through the outer mounting holes into the tabular array bottom with No. ten x one-1/ii in. screws. Scribe and cut the pieces of 1-ane/2 in. x one-1/2 in. pino to fit between two legs. Spike the pine to the table.
Fasten the legs to the height as shown in Photo 17, making sure to adjust the leg pattern to complement the top. Nosotros positioned our leg assembly to align with the tile cross in the tabletop.
If your tile is porous, you'll accept to seal information technology before grouting. Since our tile was stone and had no glaze, we purchased a sealer, rolled information technology on the tile and allow it dry before grouting. The sealer keeps the grout from hazing the stone surface. If you're using glazed tile, you'll be able to grout without sealing. Mix the grout but every bit you did the mortar.
Some grouts require a latex additive, then follow the manufacturer'southward instructions. Push button the grout into the spaces between the tile with a grout bladder and and then wipe the pinnacle with a clammy sponge several times to remove the backlog grout and prevent hazing. Allow the grout set and cure for a few days, and then apply a sealer to the entire top to protect it.
One last note: You'll demand to paint the legs to protect them from rusting and you'll also need to pigment the forest leg braces. Remove the legs to exercise this. Paint the wood braces and then wipe the steel with mineral spirits and scuff it with steel wool to prepare the surface. Prime the steel and and so paint it.
We used a patina kit to simulate an aged brass finish (available at hardware stores and domicile centers). This is a multi-stride system that gives not bad results and is tough enough for outdoor employ. Follow the production directions.
Required Tools for this DIY tile top patio table project
Take the necessary tools for this DIY projection lined up earlier you start—yous'll save time and frustration.
Margin trowel,
1/8-in. notched trowel,
one/4-in. notched trowel
You'll too need a carbide-dust jigsaw blade.
Originally Published: June 20, 2017
Source: https://www.familyhandyman.com/project/build-an-outdoor-table-with-tile-top-and-steel-base/
0 Response to "what to use to seal ceramic tile outdoor table top"
Post a Comment